Setting up A/B testing in Universal Analytics


In the current sea of Internet sharks, it is becoming increasingly difficult to survive. High competition requires constant work on the resource, monitoring competitors, experimenting with various elements of the site and introducing trending chips. At the same time, costs should be kept to a minimum. Split testing will help to conduct experiments and monitor their effectiveness, and then implement the most successful ones.
The concept of split testing

Split testing, also known as A / B testing , is a method that helps to identify the most effective elements of the site, depending on what is being tested (header, call to action button, design, etc.).
Advantages:
- Objective assessment of the effective variant of the element under test.
- Minimum testing costs.
- Existing traffic is used (without attracting additional traffic).
- Within 5 minutes, you can return to the most successful option.
Absolutely all elements of the site lend themselves to testing: from headlines to videos, images and the location of elements on the site.
What you need to conduct A / B testing:
- Google Analytics.
- The original version of the element and the test one.
- The work of the programmer (for amendments).
- The work of an SEO specialist (for test settings).
For example, consider the situation: you are the owner of a landing page for the sale of monopods. There are visitors to the site, but the conversion rate is very low. Data analysis in Google Analytics showed that most of the visitors leave the site when placing an order.
Let's start testing
Step one . Object selection.
We will change the order form. The current order form is:

The test form will look like this:

Step two . Setting up an experiment.
In the Google Anlytics sidebar, select "Behavior", then "Experiments", click "Create Experiment":

In the proposed fields, you can select the percentage of participating traffic. In order to get the most reliable result, it is desirable to use the largest amount of traffic (participants). But, you need to remember that by specifying 100%, you risk losing profit in case of an unsuccessful experiment. Therefore, it is better to start with 5-10%, gradually bringing it to the maximum rate.

Step three . Experiment settings.

Here we fill in all the fields: site address, page name, version of the page that will be included in the experiment, etc.
Step four . Code setting.
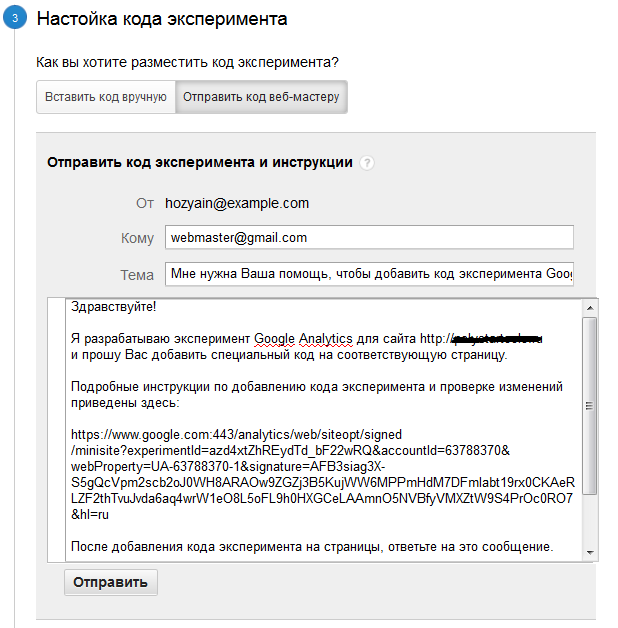
After all the previous steps have been successfully completed, Google Analytics will automatically generate the code. It must be transferred to the programmer, indicating the place where it needs to be "filled".
Step five . Launch.
After the code on the pages is installed, click "Start experiment". Now we are waiting for the result, at the same time we monitor the conversion and gradually increase the tested traffic.
In the end, Google Analytics will stop our experiment and display its results in a pivot table when the result is reached. After testing is over, you need to delete the experiment code and the losing page, leaving the most converting one.
That's all, use split testing more often, because this is the best option for optimizing the landing pages of the site. All sales! :-)